How to Monetize with ProfitDiv
1. Login to Dashboard
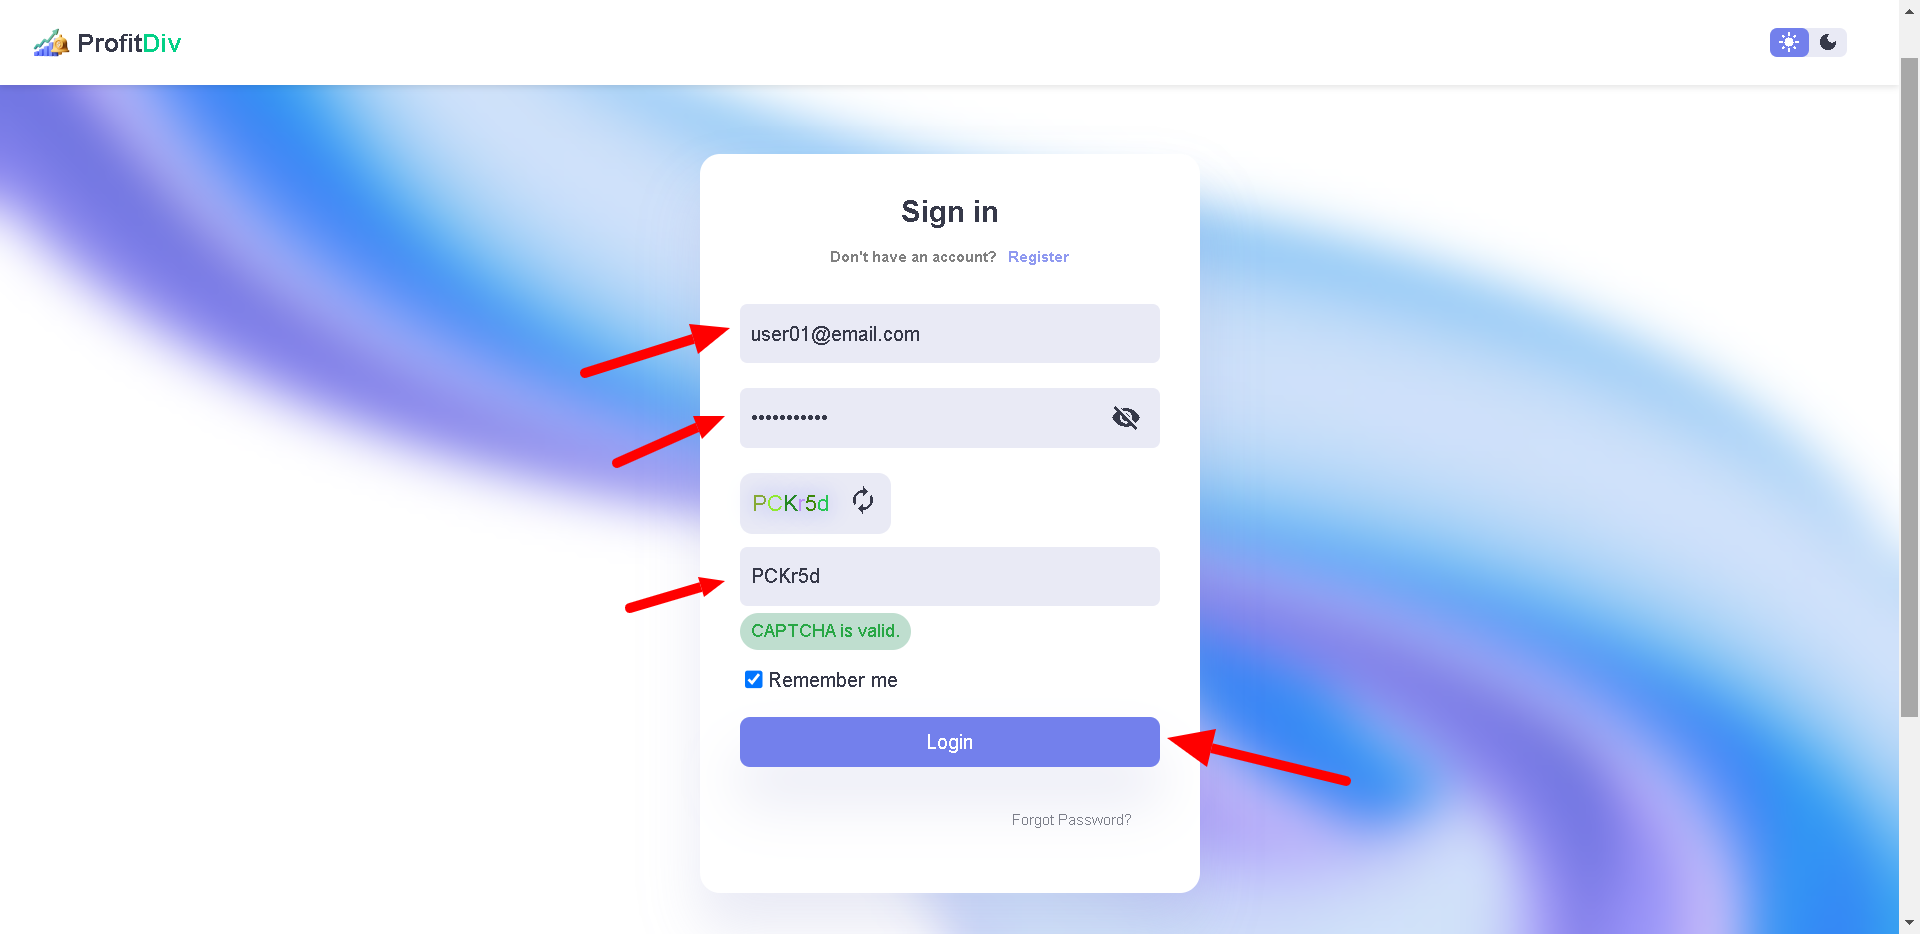
Go to https://dashboard.profitdiv.com/
- Enter Your Email Address: In the "Email" field, input the email address associated with your ProfitDiv account.
- Enter Your Password: In the "Password" field, type in your password. Make sure it’s entered correctly.
- Complete the CAPTCHA: You will see a CAPTCHA challenge to verify that you are not a robot.
- Click the "Sign In" Button: After completing the CAPTCHA, click on the "Sign In" button to log into your account.
• For instructions on how to create a ProfitDiv account, please go Here

2. Dashboard
Upon successful login, you’ll be redirected to your ProfitDiv dashboard, where you can manage and view your account information and data.

3. Add App
- On the left sidebar, click on the "Apps" tab.
- On the top right corner, click the "Add New App" button.
- In the "Google Play Store URL" field, paste the link to your app/game from the Google Play Store.
- After adding the URL, click the "Submit" button.

4. Create Ad Units
- Navigate to the "Ad Units" section from the left sidebar.
- Click the "Create Ad Unit" button on the top right.
- In the "Ad Unit Name" field, enter a unique name for the ad unit (e.g., first_ad_unit).
- From the "Select App" dropdown, choose the app you wish to associate with this ad unit.
- Choose the "Ad Type" from the available options (e.g., Push Notification).
- After filling in all the details, click "Submit" to create the ad unit.
 Note:
Note:
- Only Approved apps will be shown in the "Select App" dropdown
-
The new ad-units will be approved within 24 - 48 hours.
If you need any help in integration feel free to contact the support team at info@profitdiv.com
5. Fill in User Details
-
Navigate to the Settings Page:
- On the left sidebar, click the "Settings." tab
-
Fill in User Information:
- Name: Enter your full name in the "Enter Name" field.
- Mobile: Provide your mobile number in the "Enter Mobile" field.
- Address: Input your residential address in the "Enter Address" field.
- City: Enter the name of your city in the "Enter City" field.
- State: Specify your state in the "Enter State" field.
- Postal Code: Input your postal or ZIP code in the "Enter Postal Code" field.
-
Country Selection:
- From the dropdown, confirm your country.
-
Account Type:
- Select your account type from the dropdown menu at the bottom, with options such as "Individual" or "Business."
-
Saving Changes:
- Once all fields are completed, save the information by clicking the "Save Settings"

6. Set up your payment method
-
Navigate to Payments:
- On the left sidebar, click on the Payments tab
-
Input Required Payment Details:
- Fill in the following information fields:
- Account Name: Enter your full name as it appears on your bank account.
- Account Number: Input your bank account number.
- Bank Name: Enter the name of your bank.
- Bank Address: Provide the bank's full address.
- Bank City: Enter the city where your bank is located.
- Bank State: Mention the state where your bank operates.
- Bank Postal Code: Add the postal code for the bank.
- Bank Swift Code: Enter the bank's SWIFT/BIC code.
- Fill in the following information fields:
-
Save Details:
- Once you've filled in the required fields, click the Save Details button located at the bottom right to save the information.
-
Cancel (if needed):
- If you wish to discard the changes, click on the Cancel button to exit without saving.

